Qashio OAuth 2.0 integration guide
Connect your product to Qashio. Your users sign in with their Qashio account, approve access, and your app receives tokens to call Qashio APIs. Two flows, one tab apart: the standard one when you host a callback URL, Qashio's in-app one when you do not.
Watch the flow
Creating an OAuth application in Qashio and collecting the credentials this walkthrough needs, recorded on UAT.
When to use this flow
Use the standard OAuth 2.0 flow when your product has a web address Qashio can redirect to.
Qashio sends the user back to your redirect_uri with the authorization code in the query
string, and your server takes it from there.
If you have no callback URL to offer: an internal script, an ERP job, a Postman collection: switch to the Qashio in-app OAuth flow tab above. Qashio hosts the callback for you there, and hands the code back inside the dashboard. Everything from the token exchange onwards is the same in both.
What you need
- A Qashio company admin account.
- Your app's callback URL (HTTPS in production).
- A Qashio OAuth client app, which gives you the Client ID and Client Secret.
Part 1: Register your application in Qashio
1. Sign in to the Qashio dashboard
Open Qashio and choose Sign in with Email, enter your email and password, and enter the SMS code if you are asked for one.
2. Open Qashio API settings
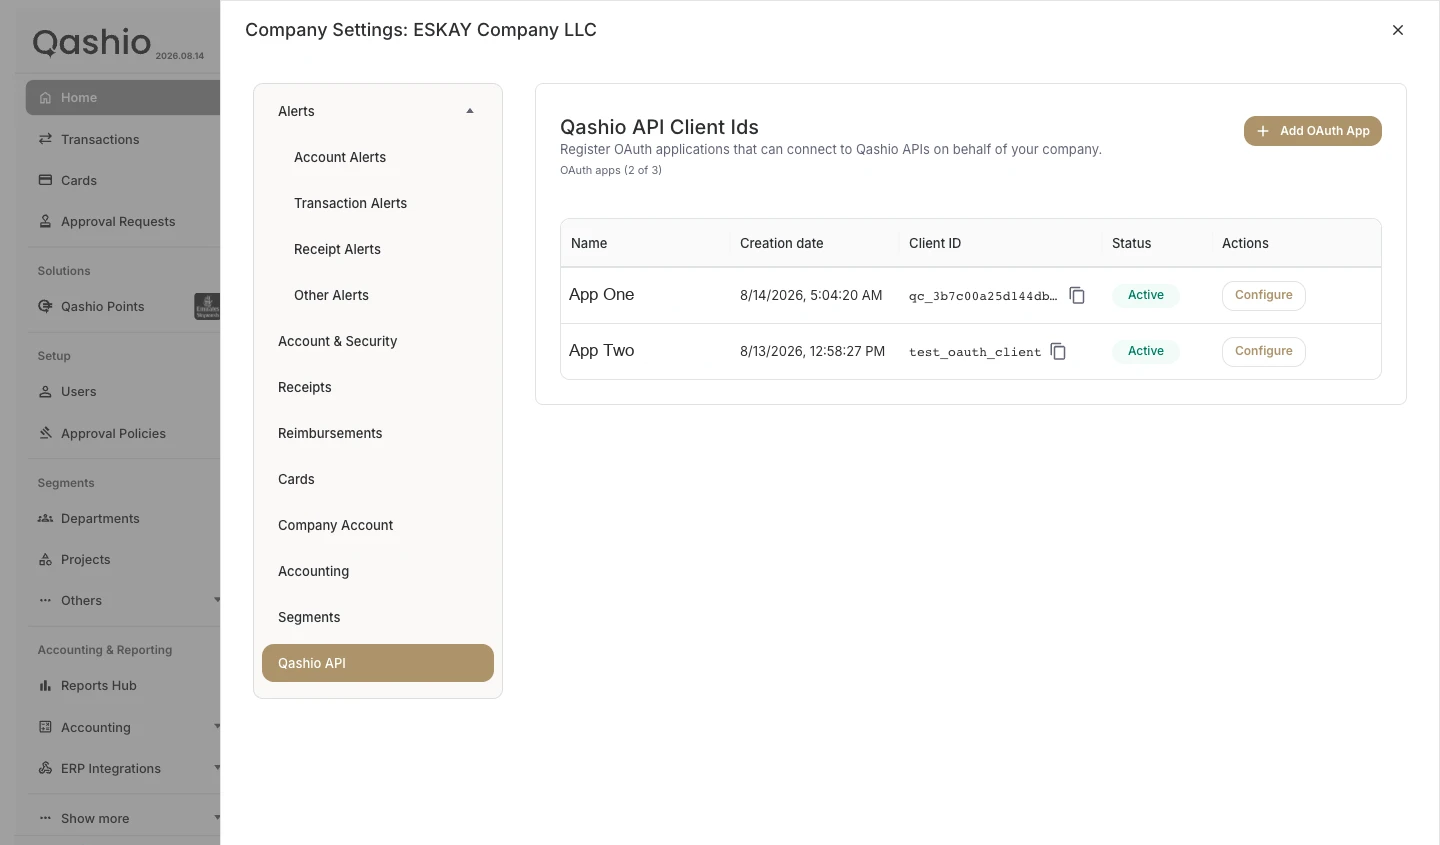
Click your avatar, then Company Settings → Qashio API.
3. Add an OAuth app
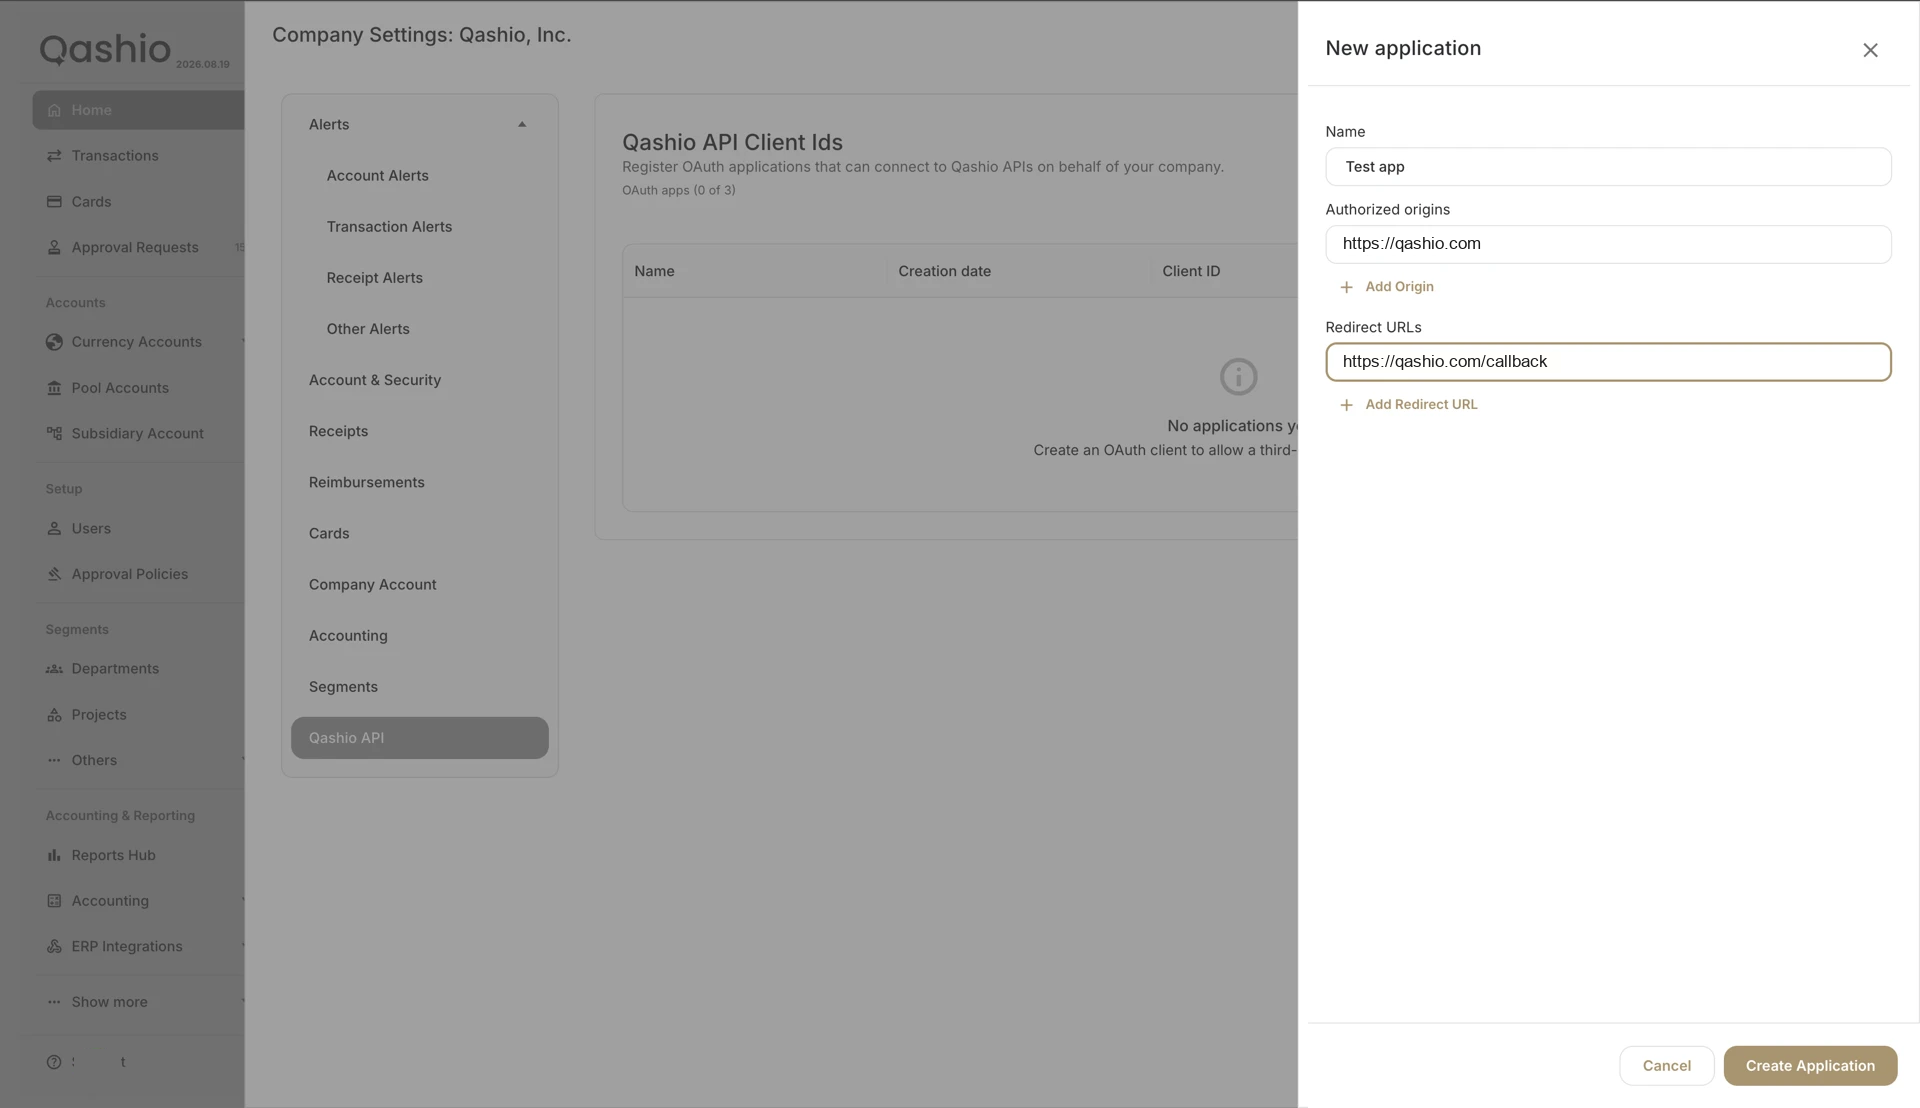
Click Add OAuth App and fill in the form.
| Field | What to enter |
|---|---|
| Name | A label your team will recognise, for example Qashio App |
| Authorized origins | Your app's origin, for example https://maidcc.com |
| Redirect URLs | The exact callback URL, for example https://maidcc.com/callback |
The redirect URL must match character for character what your app sends later.
Click Create application.
4. Copy the Client ID and Client secret
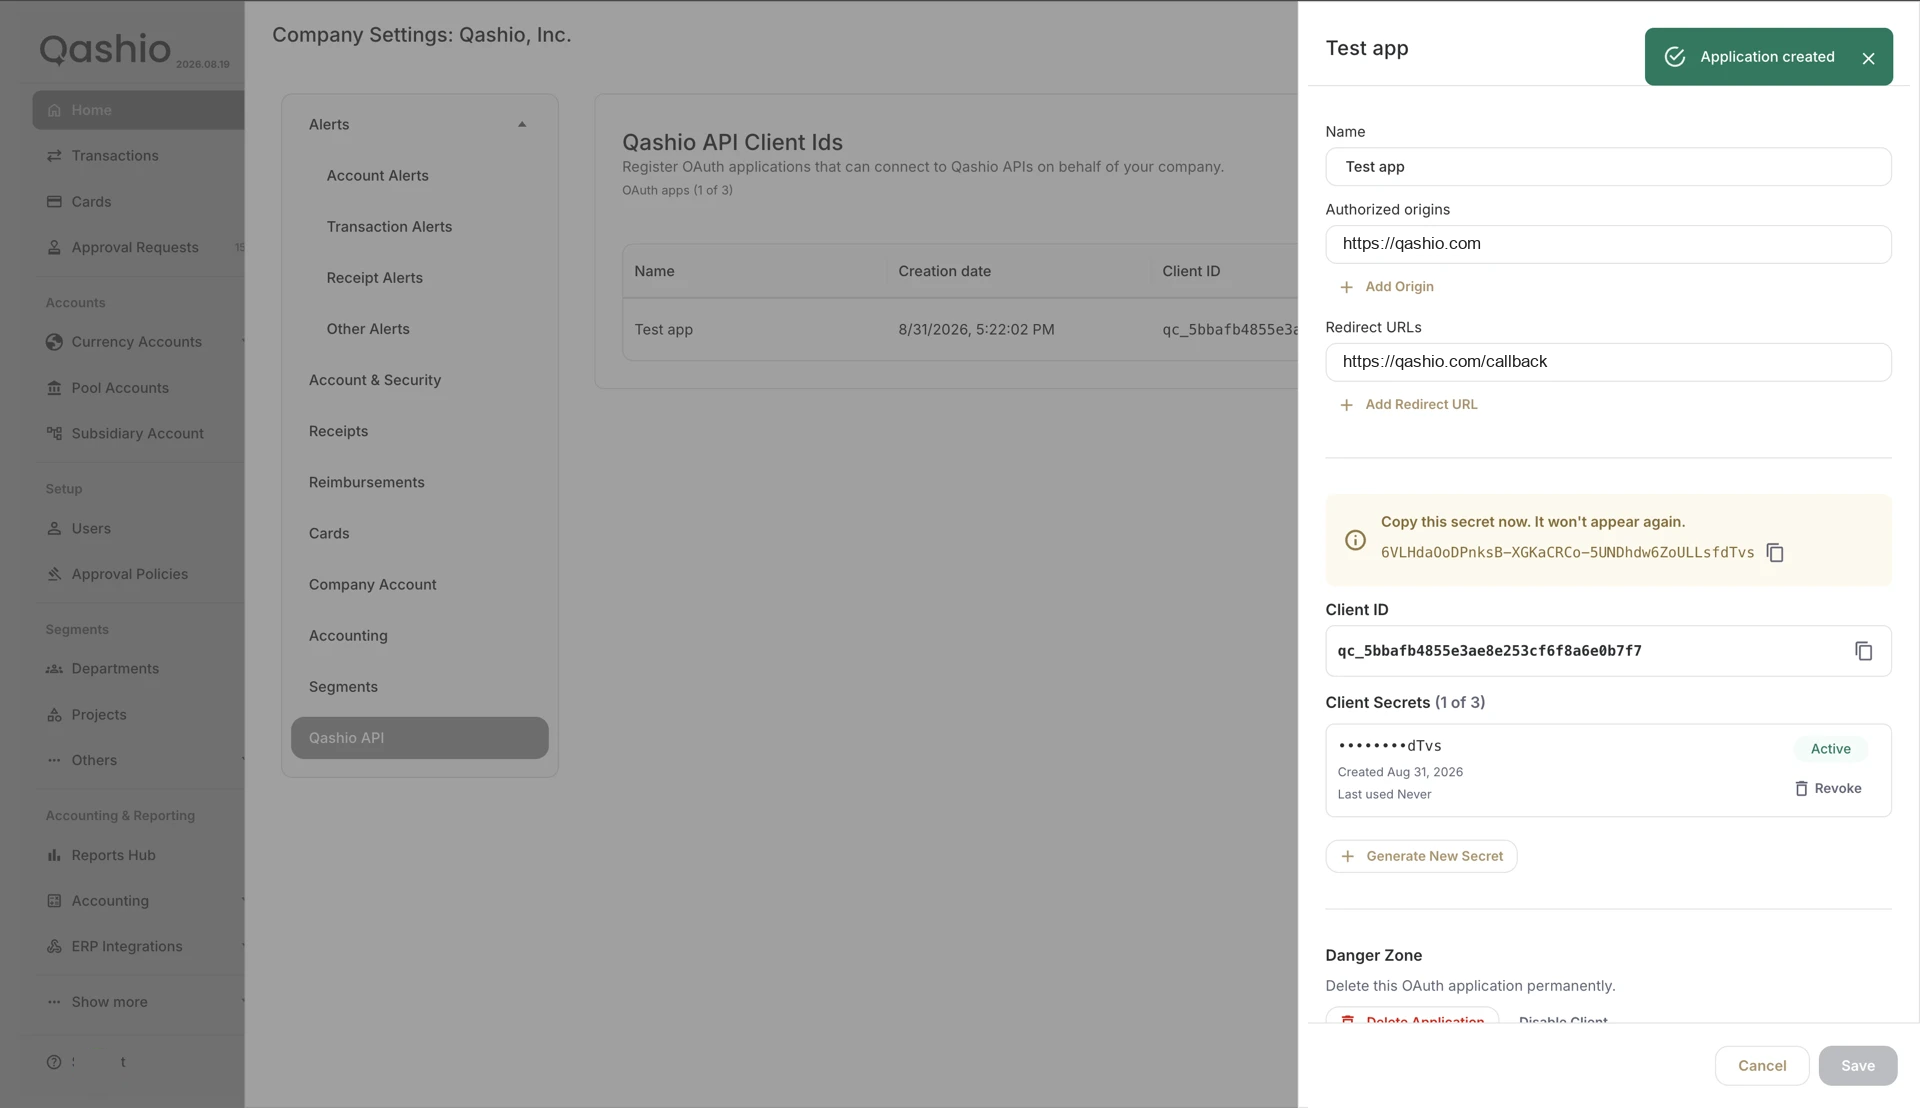
The client secret is shown once. Copy it immediately and store it on your server.
| Credential | Format | Where it is used |
|---|---|---|
| Client ID | Starts with qc_ | Authorize URL and token requests |
| Client secret | Long random string | Token requests only, server-side |
Part 2: Send the user to Qashio
From your app, redirect the browser to the authorize URL.
https://app.qashio.com/oauth/authorize
  ?client_id=qc_YOUR_CLIENT_ID
  &redirect_uri=https://maidcc.com/callback
  &response_type=code
&state=a3e71e656e014153| Field | Required | Example |
|---|---|---|
client_id | yes | qc_… |
redirect_uri | yes | https://maidcc.com/callback (must match the registered URL) |
response_type | yes | code |
state | yes | A random string you generate per attempt, for CSRF protection |
Store
statein the user's session before the redirect. You will check it on the way back.
Part 3: The user signs in and allows access
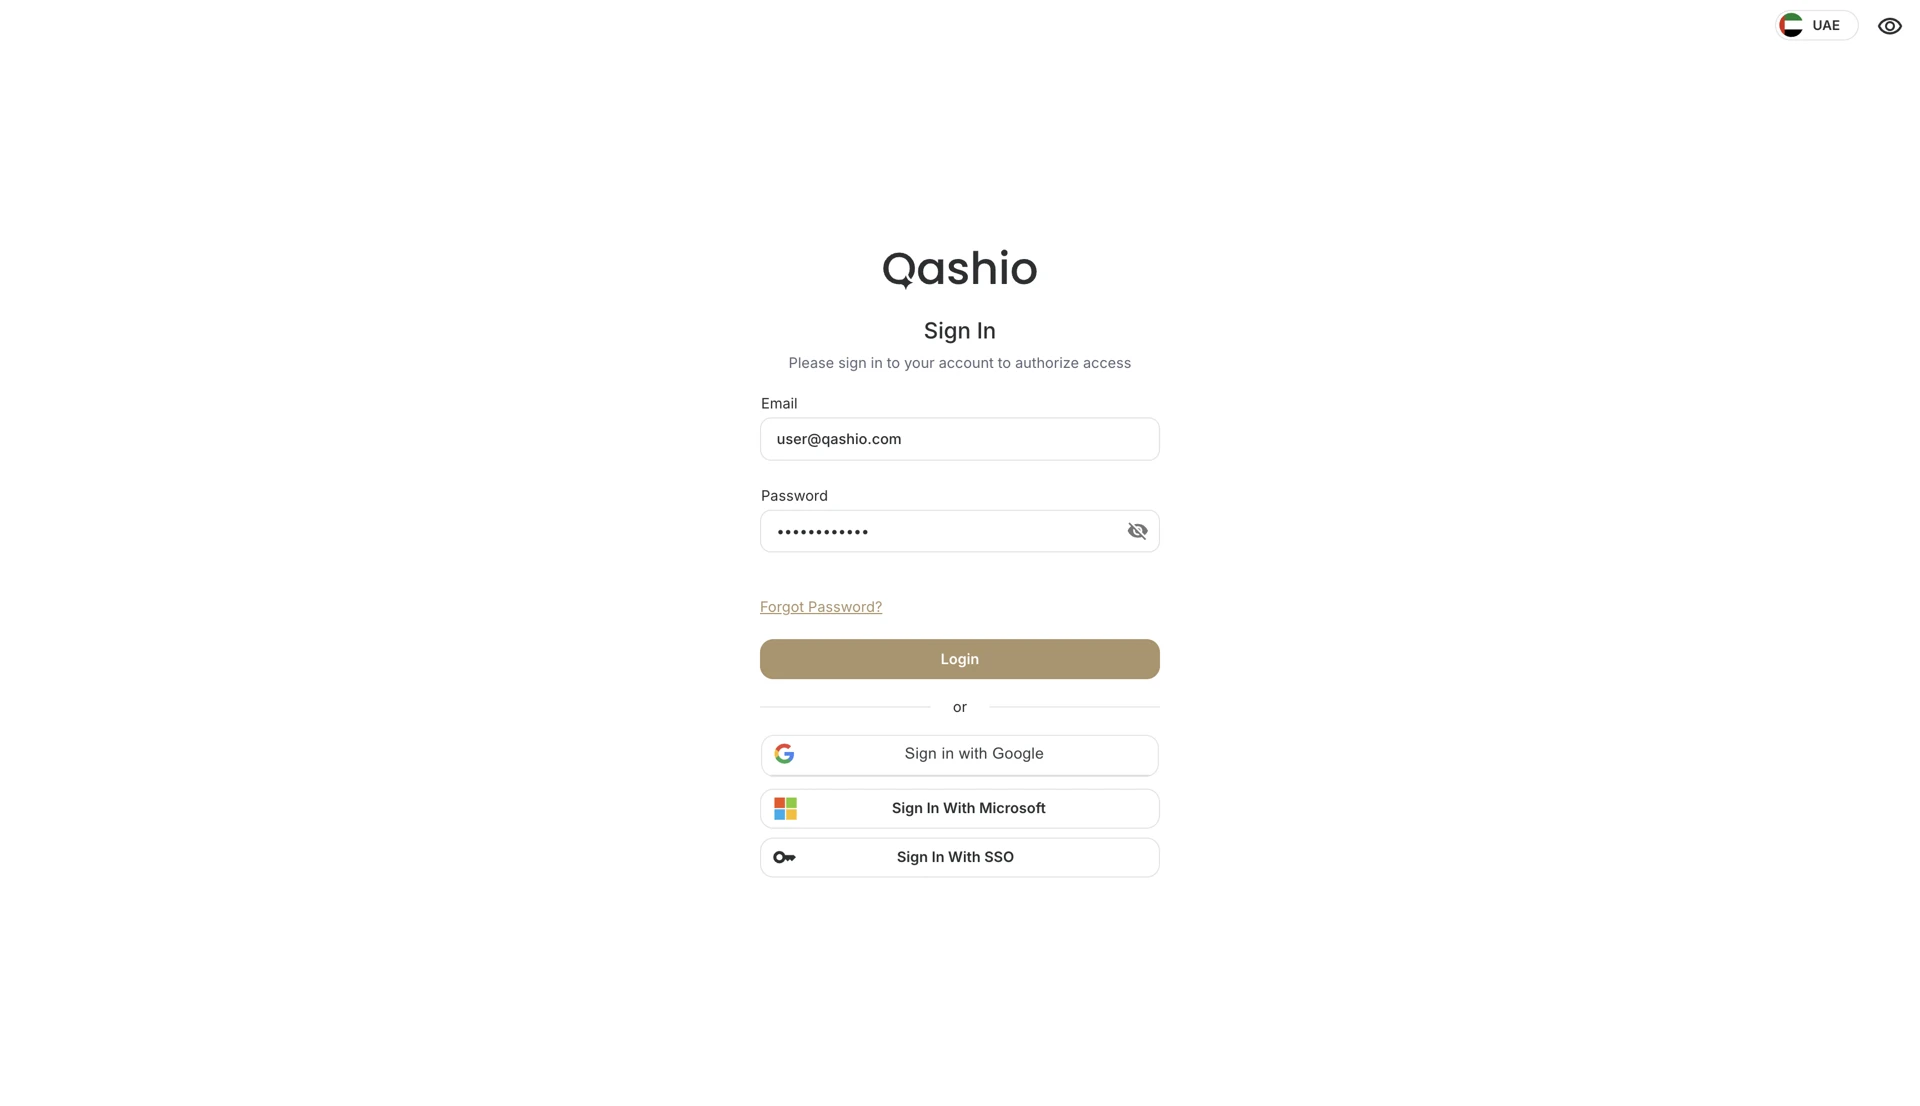
Qashio opens its sign-in page, subtitled "Please sign in to your account to authorize access". The user chooses Sign in with Email, enters their credentials, and confirms with SMS if asked.
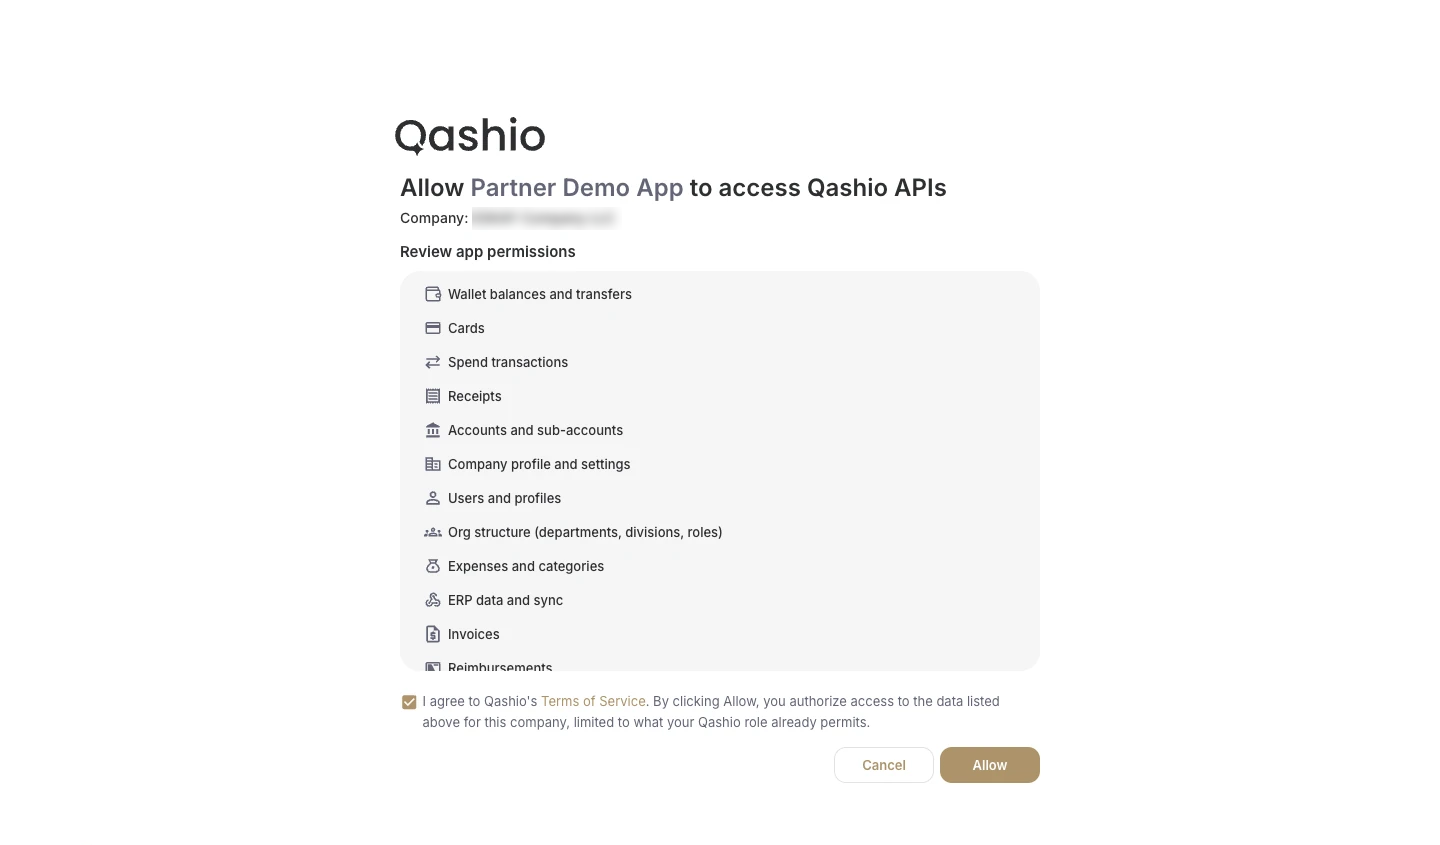
Qashio then shows the consent screen: the app name, the company the app is bound to, the permissions it can use, and a Terms of Service checkbox. The user reviews it, ticks the terms, and clicks Allow.
Cancel stops the flow. Qashio will not send a code to your app.
Part 4: Handle the callback and get tokens
Qashio redirects the browser back to your registered URL:
https://maidcc.com/callback?code=…&state=…On your server, in order:
- Read
codeandstatefrom the query string. - Confirm
statematches the value you stored in Part 2. If it does not, abort. - Exchange the code for tokens.
The code is one-time use and short-lived. Exchange it immediately. Access tokens usually last about 15 minutes, refresh tokens about 30 days.
Exchange the code
POST https://api.qashio.com/oauth2/token
Content-Type: application/json| Field | Value |
|---|---|
grant_type | authorization_code |
code | The code from the callback |
redirect_uri | The same URL you sent on authorize |
client_id | Your Client ID |
client_secret | Your Client secret |
{
  "grant_type": "authorization_code",
  "code": "PASTE_CODE_HERE",
  "redirect_uri": "https://maidcc.com/callback",
  "client_id": "qc_YOUR_CLIENT_ID",
  "client_secret": "YOUR_CLIENT_SECRET"
}
The response carries:
| Field | Meaning |
|---|---|
access_token | A JWT. Send it as Authorization: Bearer … on API calls |
token_type | Bearer |
refresh_token | Long-lived token used to mint a new access token |
Common mistakes
| Symptom | Cause | Fix |
|---|---|---|
| Authorization issue | Wrong or inactive Client ID | Copy the Client ID from Qashio API settings |
| Authorization issue | redirect_uri not registered | Register the exact callback URL, then send that same value |
| Token exchange fails | redirect_uri on the token request differs from authorize | Send the identical value both times |
| Token exchange fails | Code reused or too old | Exchange immediately; codes are one-time |
401 on APIs | Access token expired, about 15 minutes | Call refresh, then retry |
| Refresh returns an error | Missing client_id or client_secret | Send both with every refresh |
| Refresh fails after a successful refresh | Old refresh token reused | Store and use the new refresh token |
| Unknown Client ID | Client ID copied incorrectly, or the app is not active | Re-copy the value from Qashio API settings and verify the app exists |
| Qashio stays on the same page during authorize | Redirect URL not registered | Add the exact redirect URL in the app configuration |
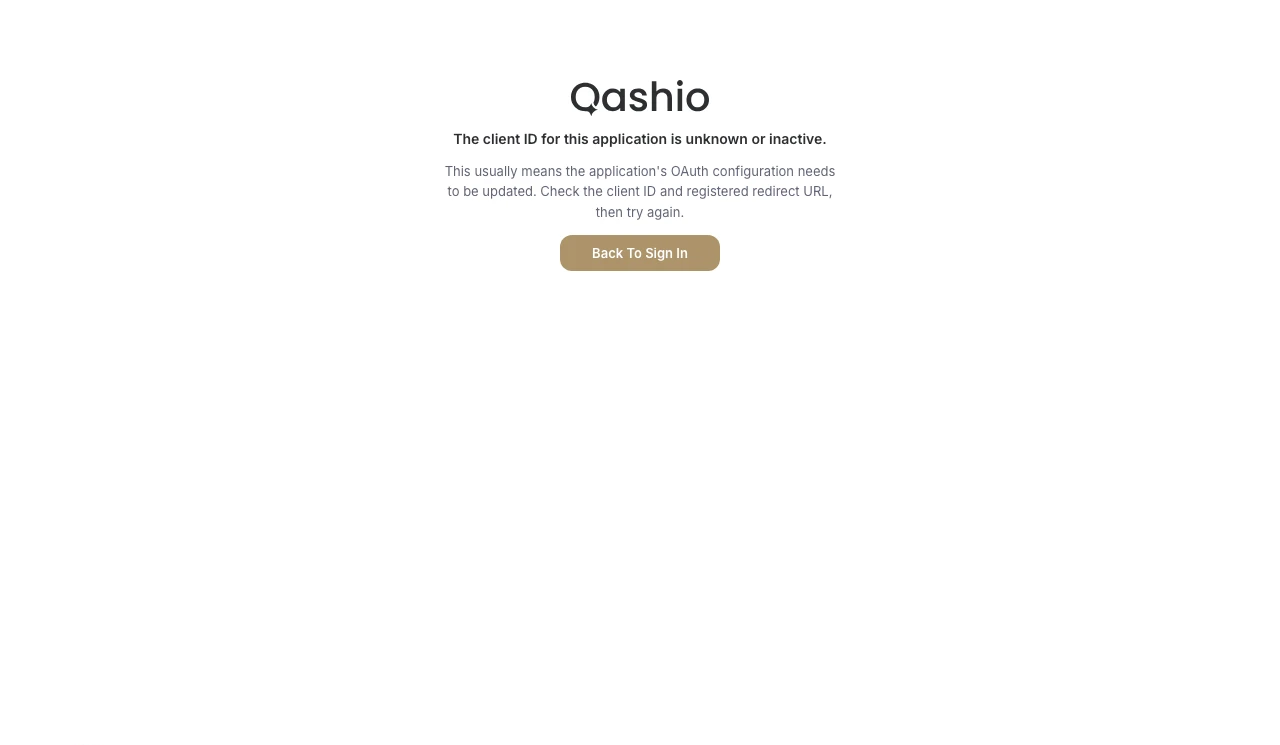
Unknown Client ID
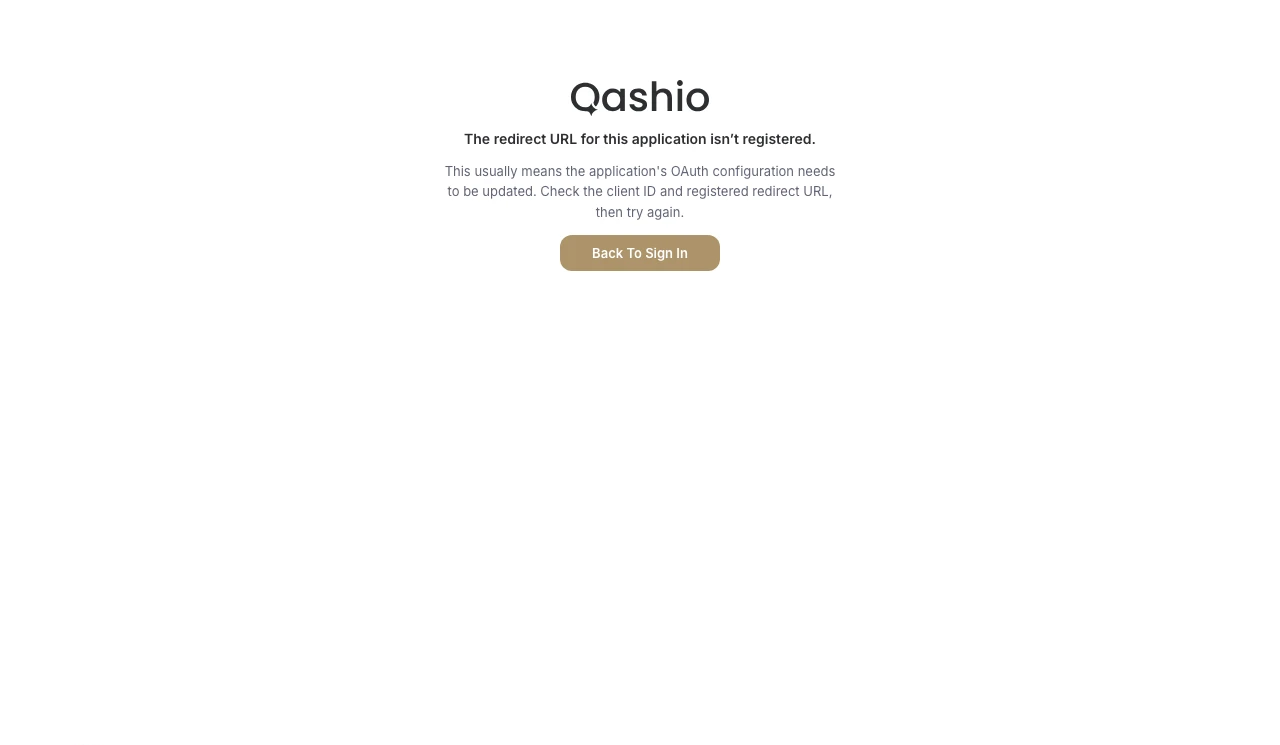
Redirect URL not registered. Qashio stays on this page: it never sends the user to an unregistered URL.
Security checklist
- Generate a new
stateon every authorize attempt. - Keep the client secret on the server only.
- Exchange the code on the server, not in the browser.
- Treat refresh tokens like passwords.
- Use HTTPS for every redirect URL in production.
You now have the full Qashio OAuth 2.0 flow: register the app, redirect for authorization, exchange the code, call the APIs, and refresh tokens before they expire.
Watch the flow
From the dashboard of the company the app belongs to: registering it, building the authorization URL, approving it, and collecting the authorization code back inside Qashio.
When to use this flow
The standard flow needs a web address you control: Qashio redirects the user to your
redirect_uri and puts the code in the query string. A finance team wiring up a script, an ERP
job or a Postman collection has no such address.
The in-app flow removes that requirement. Qashio hosts the callback itself, and after the user approves, it brings them back into the Qashio dashboard with the authorization code on screen, ready to copy.
Everything after the code is identical to the standard flow: the same /oauth2/token exchange,
the same access and refresh tokens, the same APIs.
Qashio enables this per company. If Redirect URLs is an editable field when you add an OAuth app, your company is on the standard flow. Ask your Qashio Customer Success Manager to turn on Redirect OAuth To Qashio for the company.
What changes
| OAuth 2.0 flow | Qashio in-app flow | |
|---|---|---|
| Who hosts the callback | You do | Qashio does |
| Redirect URLs in the app form | You enter your callback | Pre-filled and read-only |
| Authorized origins | Your app's origin | Optional |
| Where the code arrives | Query string on your callback | Company Settings → Qashio API → the app's panel |
| How the code reaches your code | Your server reads it | A person copies it |
state | You generate and verify it | Qashio checks it and keeps it out of the URL |
| Token exchange | POST /oauth2/token | Identical |
What you need
- A Qashio company admin account.
- The company switched on for in-app OAuth.
- Somewhere server-side to run one
POSTwith the Client Secret.
Part 1: Register your application in Qashio
1. Sign in to the Qashio dashboard
Open Qashio and choose Sign in with Email, enter your email and password, and enter the SMS code if you are asked for one. If your account belongs to more than one company, switch to the company the app is for first: the app, the consent and the token are all bound to that company.
2. Open Qashio API settings
Click your avatar, then Company Settings → Qashio API.
3. Add an OAuth app
Click Add OAuth App. The form asks for less than the standard flow does.
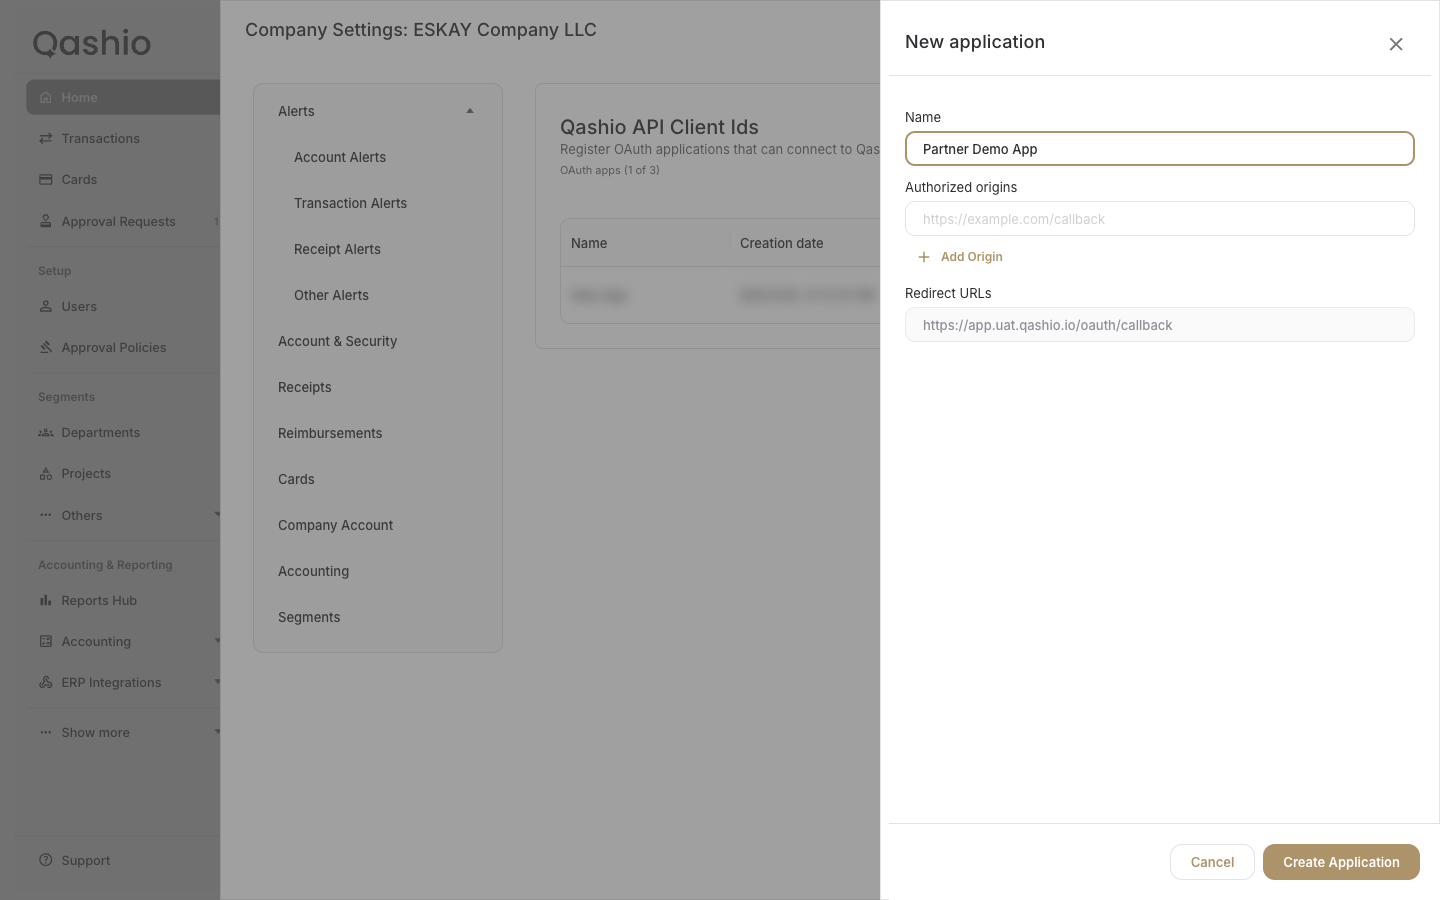
| Field | What to enter |
|---|---|
| Name | A label your team will recognise, for example Partner Demo App |
| Authorized origins | Optional. Leave it empty unless a browser app will call Qashio directly |
| Redirect URLs | Filled in and locked by Qashio: https://app.qashio.com/oauth/callback |
You cannot replace the redirect URL with your own domain, and you do not need to. That locked value is the one you will send on the authorize request.
Click Create application.
4. Copy the Client ID and Client secret
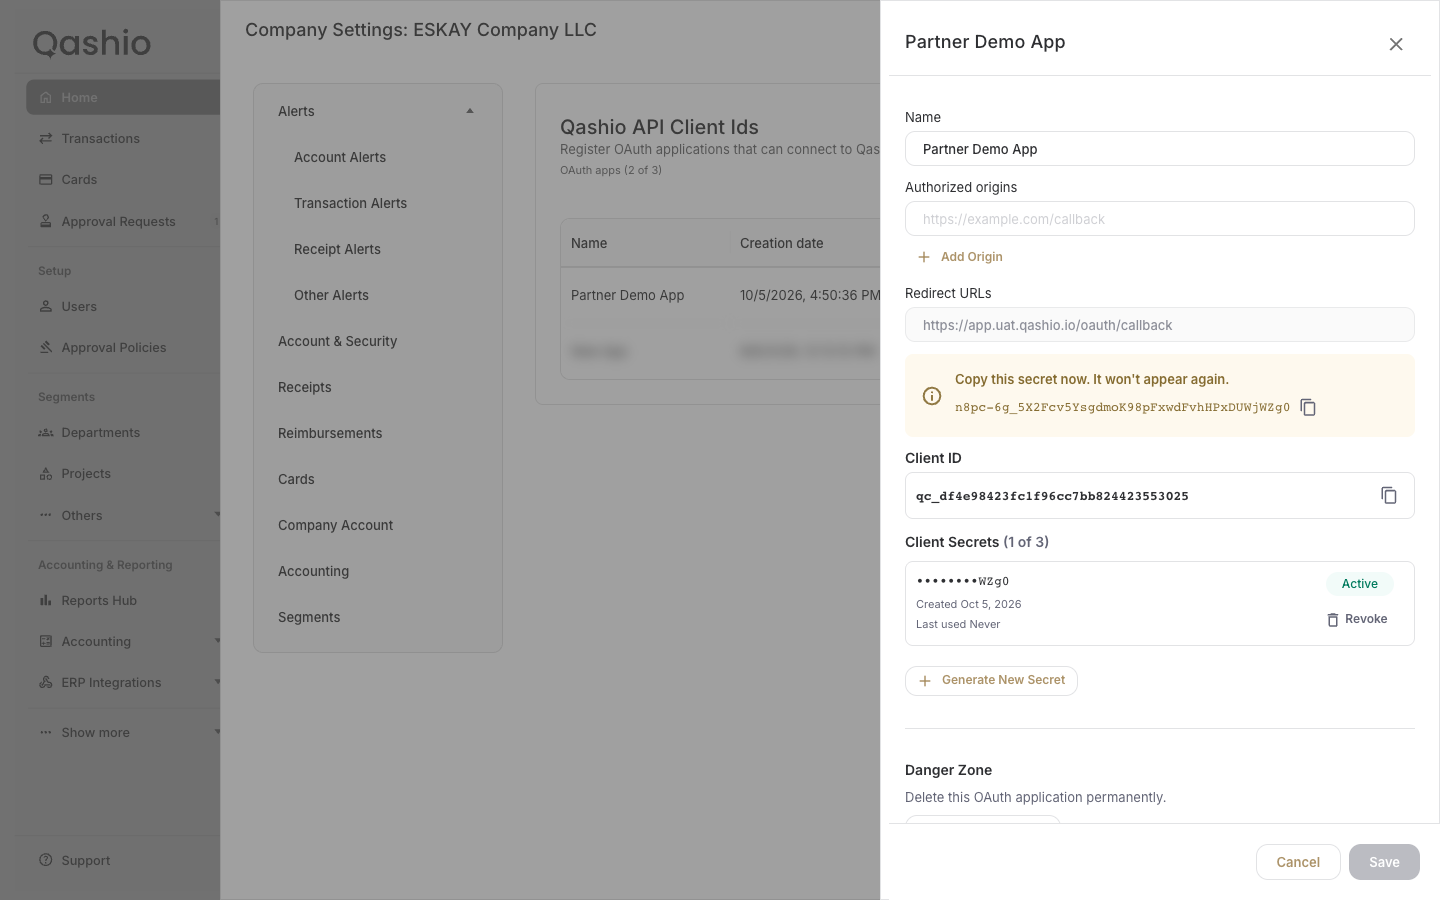
The client secret is shown once. Copy it immediately and store it on your server.
| Credential | Format | Where it is used |
|---|---|---|
| Client ID | Starts with qc_ | Authorize URL and token requests |
| Client secret | Long random string | Token requests only, server-side |
Part 2: Build the authorization URL
Four parameters, and three of them you already have.
https://app.qashio.com/oauth/authorize
  ?client_id=qc_YOUR_CLIENT_ID
  &redirect_uri=https://app.qashio.com/oauth/callback
  &response_type=code
&state=a3e71e656e014153| Field | Required | Value |
|---|---|---|
client_id | yes | The qc_… value from the app |
redirect_uri | yes | Qashio's own callback, exactly as the locked field shows it |
response_type | yes | code |
state | yes | A random string you generate per attempt |
redirect_uriis still required and still checked. The only difference is that the registered value belongs to Qashio rather than to you. Sending your own domain here fails the same way an unregistered URL fails in the standard flow.
Open that URL in a browser, or send it to whoever will authorise the app.
Part 3: The user signs in and allows access
Qashio opens its sign-in page, subtitled "Please sign in to your account to authorize access".
Then the consent screen: the app name, the company the app is bound to, the permissions it can use, and a Terms of Service checkbox. The user ticks the terms and clicks Allow.
Cancel stops the flow. No code is issued.
Part 4: Collect the authorization code
Instead of leaving Qashio, the user lands back in the dashboard, on the app they just approved:
https://app.qashio.com/home?drawer=company-settings&tab=qashio-api&client_id=qc_…The app's panel opens with the code at the top.
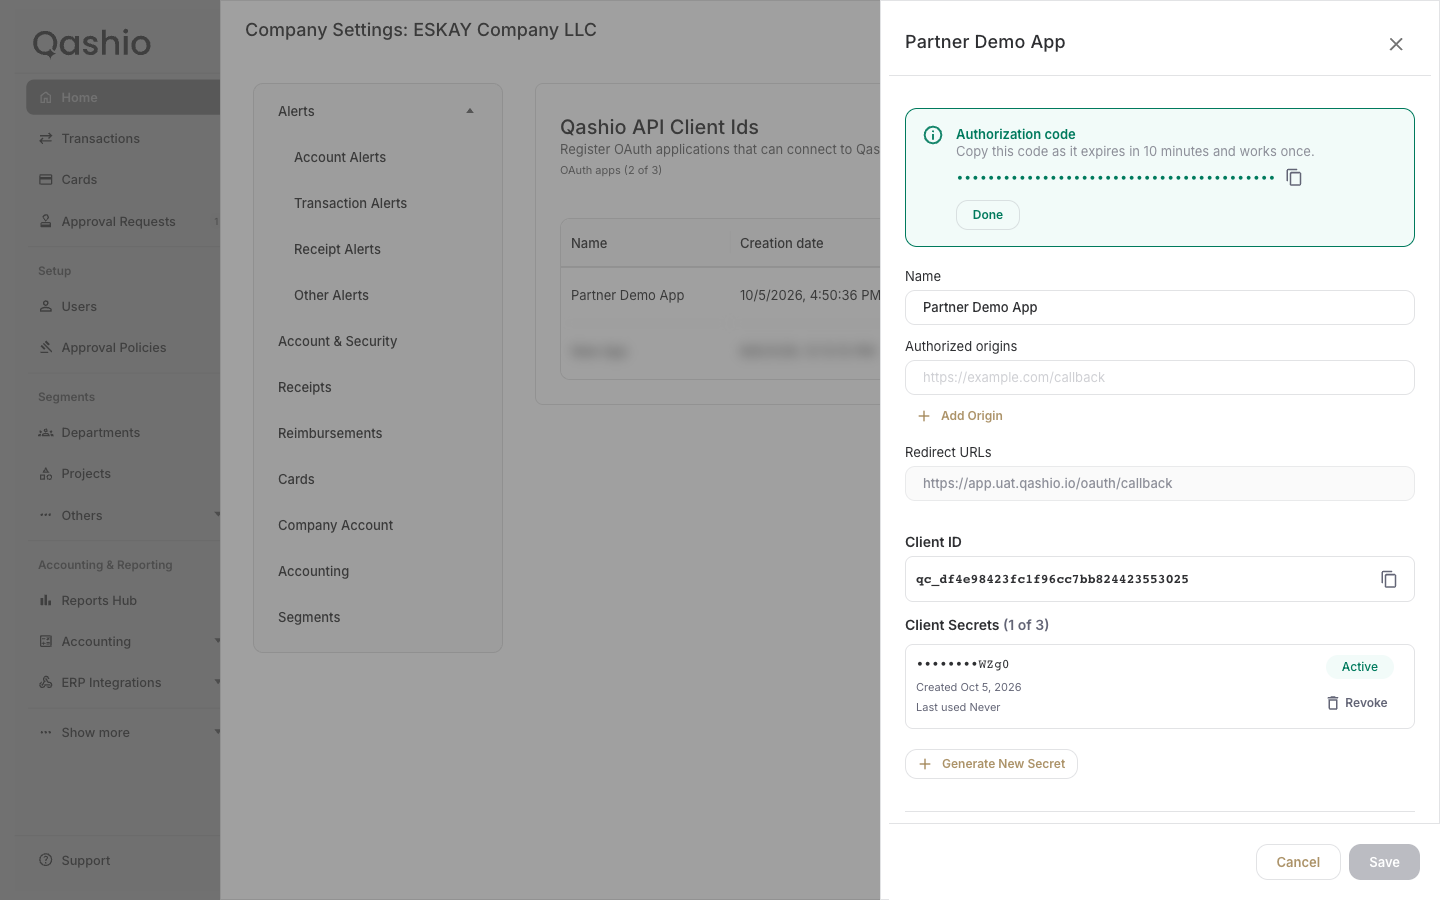
| What you see | Why |
|---|---|
| The code is masked | It is a credential; the copy button puts the real value on the clipboard |
| "expires in 10 minutes and works once" | The same short, single-use code as the standard flow |
No code or state in the address bar | Qashio keeps both out of the URL and out of browser history |
| Done dismisses the card | The code is gone from the screen; a new one needs a new authorize round |
Click the copy button and hand the value to whatever will do the exchange.
Part 5: Exchange the code for tokens
Identical to the standard flow, on your server, within ten minutes.
POST https://api.qashio.com/oauth2/token
Content-Type: application/json{
"grant_type": "authorization_code",
"code": "PASTE_CODE_HERE",
"redirect_uri": "https://app.qashio.com/oauth/callback",
"client_id": "qc_YOUR_CLIENT_ID",
"client_secret": "YOUR_CLIENT_SECRET"
}
redirect_urimust be Qashio's callback here too, character for character. It is the value the code was issued against.
The response carries:
| Field | Meaning |
|---|---|
access_token | A JWT bound to the company and to your Client ID. Send it as Authorization: Bearer … |
token_type | Bearer |
refresh_token | Long-lived token used to mint a new access token |
scope | The space-separated scopes the grant covers |
From here, Authentication covers calling the API, refreshing and validating tokens. Nothing in those steps is specific to this flow.
Common mistakes
| Symptom | Cause | Fix |
|---|---|---|
| Redirect URLs is an editable field | The company is on the standard flow | Use the OAuth 2.0 flow tab, or ask Qashio to enable in-app OAuth |
| Authorization issue on authorize | redirect_uri set to your own domain | Send Qashio's callback, exactly as the locked field shows it |
| Authorization issue on authorize | Wrong or inactive Client ID | Re-copy the Client ID from Qashio API settings |
401 Authorization code already used | The code was exchanged twice | Codes are single-use; run authorize again for a new one |
| Token exchange fails | redirect_uri missing or different | Send Qashio's callback on the token request as well |
Token exchange returns 401 | client_secret missing | Both client_id and client_secret are required |
| The code card is gone | Done was clicked, or the page was reloaded after dismissing | Run the authorize URL again |
401 on APIs | Access token expired | Refresh, then retry |
Security checklist
- Generate a new
stateon every authorize attempt. - Treat the copied code like a password while it is in transit to your server.
- Keep the client secret on the server only; the exchange never happens in a browser.
- Delete apps you no longer use. Deleting one revokes its secrets and stops existing access.
- Use the shortest path from copy to exchange: the code lives for ten minutes.